Designing a Web site
Designing and implementing a Web site is a complex process that requires careful planning. These excerpts from Using Dreamweaver 4 (2000) Macromedia Inc. (book and tutorial) provide a structure for the planning process. Although specific references and descriptions are geared toward use of Dreamworld, the process is general. It should be used in ALL designs of Web sites and in designs of all digital libraries.
The general process consist of a loop and feedback among
Any and all digital library projects have to have to go through all these stages. There should be a writen documentation about each stage.
Macromedia Dreamweaver 4 is a professional HTML editor for visually designing and managing Web sites and pages.
Planning overview
A Web site is a set of linked documents with shared attributes, such as related topics, a similar design, or a shared purpose.
Macromedia Dreamweaver is a site creation and management tool, so you can use it to create complete Web sites, in addition to individual documents. For best results, design and plan your Web site before you create any of the pages that the site will contain.
Note: If you can't wait to start creating documents immediately, you can try out some of Dreamweaver's document-creation tools and make a sample document. (See Creating, opening, and saving HTML documents.) But don't start serious document development until you've set up a site.
The first step in creating a Web site is planning. See About site planning and design. The next step is to set up the basic structure of the site; see Using Dreamweaver to set up a new site. If you already have a site on a Web server and you want to begin using Dreamweaver to edit that site, see Setting up a remote site.
About site planning and design
In Dreamweaver, the term site can refer either to a Web site or to a local storage location for the documents belonging to a Web site. When you begin thinking about creating a Web site, you should follow a series of planning steps to make sure your site succeeds. Even if you are just creating a personal home page that only friends and family will see, it can still be to your advantage to plan the site carefully in order to make sure everyone will be able to use it successfully.
Determining your goals
Deciding what your site goals are is the very first step you should take when you create a Web site. Ask yourself or your client questions about the site. What do you hope to accomplish by having a Web site? Write down your goals so that you remember them as you go through the design process. Goals help you focus and target your Web site to your particular needs.
A Web site that provides news about a specific subject should have a very different look and navigation than a Web site that will sell products. The complexity of your goals will affect the navigation, the media that you use (Flash, Director, and so on), and even the look and feel of your site.
Choosing a target audience
After you have decided what you want to accomplish with your Web site, you need to decide who you want to visit your site. This may seem to be a silly question, since most people want everyone to visit their Web site. However, it is difficult to create a Web site that every single person in the world will be able to use. People use different browsers, connect at different speeds, and may or may not have media plug-ins. All these factors can affect the use of your site. That is why you need to determine a target audience.
Think about the people who will be attracted to your Web site, or who you hope to attract. What kinds of computers do you think they will be using, what platform might be the dominant one (Macintosh, Windows, Linux, and so on)? What is the average connection speed (33.6 modem or DSL)? What kinds of browsers and monitor sizes will they be using? Are you creating an intranet site where everyone will be using the same computer OS and browser? All of these factors can greatly affect the way your Web page appears to visitors. Once you choose the audience and have determined what types of computers, connection speeds, and browsers they will be using, you can target your design.
For example, say your target audience is predominantly Windows users with 17-inch monitors and using Internet Explorer 3.0 or above. As you design your Web page, you should test that your site works best in Microsoft Internet Explorer on a Windows computer with a screen size of 800 x 600 pixels. Fewer viewers may use Netscape Navigator on a Macintosh platform, but you should also make sure your site still works on those machines, although it may not display as precisely as it does for your target audience.
Creating sites for browser compatibility
As you create your site, you should be aware of the variety of Web browsers your visitors are likely to use. Where possible, design sites for maximum browser compatibility, given other design constraints.
There are over two dozen different Web browsers in use, most of which have been released in more than one version. Even if you target only Netscape Navigator and Microsoft Internet Explorer, which are used by the majority of Web users, be aware that not everyone uses the very latest versions of those browsers. If your site is on the Web, sooner or later someone will visit it using Netscape Navigator 2.0or the browser that AOL provides its customers, or a text-only browser such as Lynx.
There are some circumstances under which there's no need to create cross-browser-compatible sites. For example, if your site is available only on your company's intranet, and you know that all of your company's employees use the same browser, you can optimize your site to rely on features of that browser. Similarly, if you're creating HTML content to be distributed on CD-ROM, and you distribute a browser on the CD, you can assume that all of your customers have access to that particular browser.
Under most circumstances, for Web sites designed for public viewing, it's a good idea to make your site viewable in as many browsers as possible. Pick one or two browsers as your target browsers, and design the site for those browsers, but try exploring the site in other browsers now and then to avoid including too much incompatible content. You can also post a message on a discussion board to ask others to view your site. This can be a good way to get feedback from a wide audience.
The more sophisticated your site isin terms of layout, animation, multimedia content, and interactionthe less likely it is to be cross-browser compatible. Not all browsers can run JavaScript, for example. A page of plain text that uses no special characters will probably display well in any browser, but such a page may have much less aesthetic appeal than one that uses graphics, layout, and interaction effectively. Try to strike a balance between designing for maximum effect and designing for maximum browser compatibility.
One useful approach is to provide multiple versions of certain important pages, such as your sites home page. For example, you can design both a framed version and a frameless version of such a page. You can then include in your Web page a behavior that automatically shifts visitors without frame-capable browsers to the frameless version. For more information, see Using the behavior actions that come with Dreamweaver.
Organizing the site structure
Organizing your site carefully from the start can save you frustration and time later on. If you begin creating documents without thinking about where in your folder hierarchy they should go, you may end up with a huge, unwieldy folder full of files, or with related files scattered through a half-dozen similarly named folders.
The usual way to set up a site is to create a folder on your local disk that contains all the files for your site (referred to as the local site), and to create and edit documents within that folder. You then copy those files to a Web server when you are ready to publish your site and allow the public to view it. This approach is better than creating and editing files on the live public Web site itself, because it allows you to test changes in the local site before making them publicly viewable, and then when you're finished, you can upload the local site files and update the entire public site at once.
See Using Dreamweaver to set up a new site to coordinate your local site with Dreamweaver. Once you set up the local site with Dreamweaver, you are better able to manage your site files, track links, update pages, and more.
Break down your site into categories. Put related pages in the same folder. For example, your company press releases, contact information, and job postings might all go in one folder, and your online catalog pages in another folder. Use subfolders where necessary. This type of organization will make your site easier to maintain and navigate.
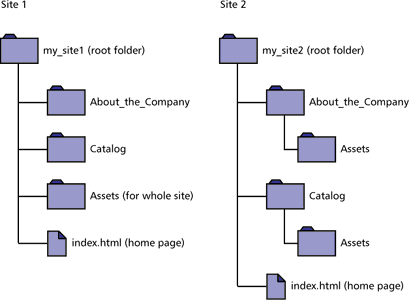
Decide where to put items such as images and sound files. It's convenient to place all your images, for example, in one location, so that when you want to insert an image into a page you know where to find it. Designers sometimes place all of the non-HTML items to be used on a site in a folder called Assets. That folder may contain other foldersfor example, an Images folder, a Shockwave folder, and a Sound folder. Or you might have a separate Assets folder for each group of related pages on your site, if there aren't many assets shared among such groups.
Use the same structure for local and remote sites. Your local site and your remote Web site should have exactly the same structure. If you create a local site using Dreamweaver and then upload everything to the remote site, Dreamweaver ensures that the local structure is precisely duplicated in the remote site.
Creating your design look
You save a lot of time later in the process if you plan your design and layout before you actually begin working in Dreamweaver. It can be as simple as creating a mock-up drawing of how you want the site layout to look on a piece of paper. A more advanced approach would be to create a composite drawing of your site using software such as Macromedia Freehand or Fireworks. The important thing is to have a mock-up of your layout and design so you can follow it later as you build your site.
It is important to maintain consistency in your page layout and design. You want users to be able to click through the pages in your site without getting confused because all the pages have a different look, or the navigation is in a different place on each page.
Designing the navigation scheme
Another area where planning pays off is navigation. As you design your site, think about the experience you want your visitors to have. Think about how a visitor to your site will be able to move from one area to another. Consider the following points:
"You are here." Visitors should easily know where they are in your site and how to return to your top-level page.
Searching and indexes make it easy for visitors to find any information they are looking for.
Feedback provides a way for visitors to contact the webmaster (if appropriate) if something is wrong with the site, and to contact other relevant people associated with the company or the site.
Design the way your navigation will look. Navigation should be consistent throughout your site. If you place a navigation bar across the top of your home page, try to keep it there for all the linked pages.
Dreamweaver has two navigation tools that you can use to create your navigation scheme. For more information, see Linking and navigation overview.
Planning and gathering your assets
Once you know what your design and layout will look like, you can create and gather the assets that you will need. Assets can be items such as images, text, or media (Flash, Shockwave, and more). Make sure you have all of these items gathered and ready to go before you begin developing your site. Otherwise, you'll have to continually stop development to find an image or to create a button.
If you are using images and graphics from a clip-art site or someone else is creating them, make sure you collect them and put them in a folder on your site (see Organizing the site structure). If you are creating the assets yourself, make sure you create them all before you start development, including any images you need if you are using roll-overs. Then organize your assets so you can access them easily while creating your site in Dreamweaver.
Dreamweaver can make it easier for you to reuse page layouts and page elements in various documents by using templates and libraries. However, it is easier to create new pages with templates and libraries than it is to apply them to existing documents.
Use templates if many of your pages will use the same layout. Plan and design a template for that layout, and then you can create new pages based on that template. If you decide to change the layout for all the pages, you can simply change the template.
Note: There are certain restrictions on what changes you can make to documents that are based on templates. Templates are best used in collaborative environments, to ensure that everyone is using the same page layout. Library items may provide more flexibility for use outside of collaborative environments.
Use library items if you know that a certain image or other content will appear on many pages throughout your site; design that content ahead of time and make it a library item. Then if you change that item later, the updated version appears on all pages that use it.
For more information on reusing page layouts and
elements, see Templates and libraries overview.